...I've had loads of people asking for instructions on how to make the wired flowers that they've seen me make using some of Sheena's dies. I put a tutorial on a few months ago for the Sweet Pea but I'm going to try and do one a week (
she swallows hard and crosses her fingers......which makes typing hard!), so thought I'd start with the orchid. I've used the 'Graceful Orchid' die which is from Sheena Douglass's Perfect Partner range, there is a matching stamp that goes alongside it but I haven't actually used the stamp here. So this is what we're going to be making ..........
So lets start at the beginning as well as your die cuts, you're going to need 26 or 28 gauge covered florists wire and some Stemtex, which is the paper stem tape that is used by many florists. It is a tape which as you stretch it slightly whilst winding it down the wires will stick to itself. It comes in a variety of colours, the one I'm using here is Moss Green.
Now when you're going to wire one of these it's a slightly different method of assembling than when you're putting together an unwired one. The main difference is you will be using two sets of petals because you will be sandwiching the wire between them, thus giving you the ability to bend the petals into whatever form you want.
This is what you're going to need to cut for one flower, oh and no fancy paper or card here just plain and simple copy paper. Not only is this cheap but is also perfect for the job (I usually use 80 or 100gsm, whatever the local supermarket has at the cheapest!), anyway as I said here is what you will need to cut......
...as you can see you will have two sets of petals, one throat (the slightly fancy oval shape) and two middles (the long pointy bit). Now to colour them I'm using AquaTints (Beautiful Grunge set) but you could use any wet colouring product. I say wet because you'll want to get the petals wet in order to enable you to shape them and so you might as wet colour and wet them in one! Oh and in case you've not done any of this before wetting and shaping the copy paper 'messes' the fibres up and so when it dries it really is remarkably sturdy!

Now I would suggest that you Google whatever flower you are going to make, to get an idea of colouring. That doesn't mean you have to try and paint it as an exact match but it will give you an idea of where to put the colours and also an idea of how the flower 'goes together' in nature. Right so now it's time to put this baby together. Working while the paper is still damp (be careful because it's more fragile but it's more easy to work this way) start by taking one of the middles, apply tacky glue (any fast grab, dries clear glue) and then lay a piece of wire down the middle as shown.....
Now lay your other matching piece down on top and press together to make sure it's well stuck.....
Now bend the wired middle into a gentle curve. Next take the throat piece and first of all cut into the petal as shown.....
Cutting into it just helps to achieve the correct shaping. Now using a ball ended modelling tool or even the end of a fat rounded paintbrush handle shape the throat so the sides curve up and the frilly front bit of the throat hangs down. The photo's below show you the shape you're aiming for......
Now you need to join your middle and throat together which because of how you've shaped it is a very simple thing to do. Take your middle and apply a little tacky glue to the top as shown....
...then wrap your throat piece around it as shown below (hold for a few seconds to allow the glue to grab).....
....and from the front it will look like this......
Now you might notice two lines of white glue in the middle.....well orchids tend to have two raised lines running down the centre of the throat. So if you have any flowersoft or as I have used here a product called Sugartex Pollen (it's an edible product used in cake decorating but perfect for the job here!) add a couple of lines of glue as shown and then sprinkle on your 'pollen' and you will have something like this.....
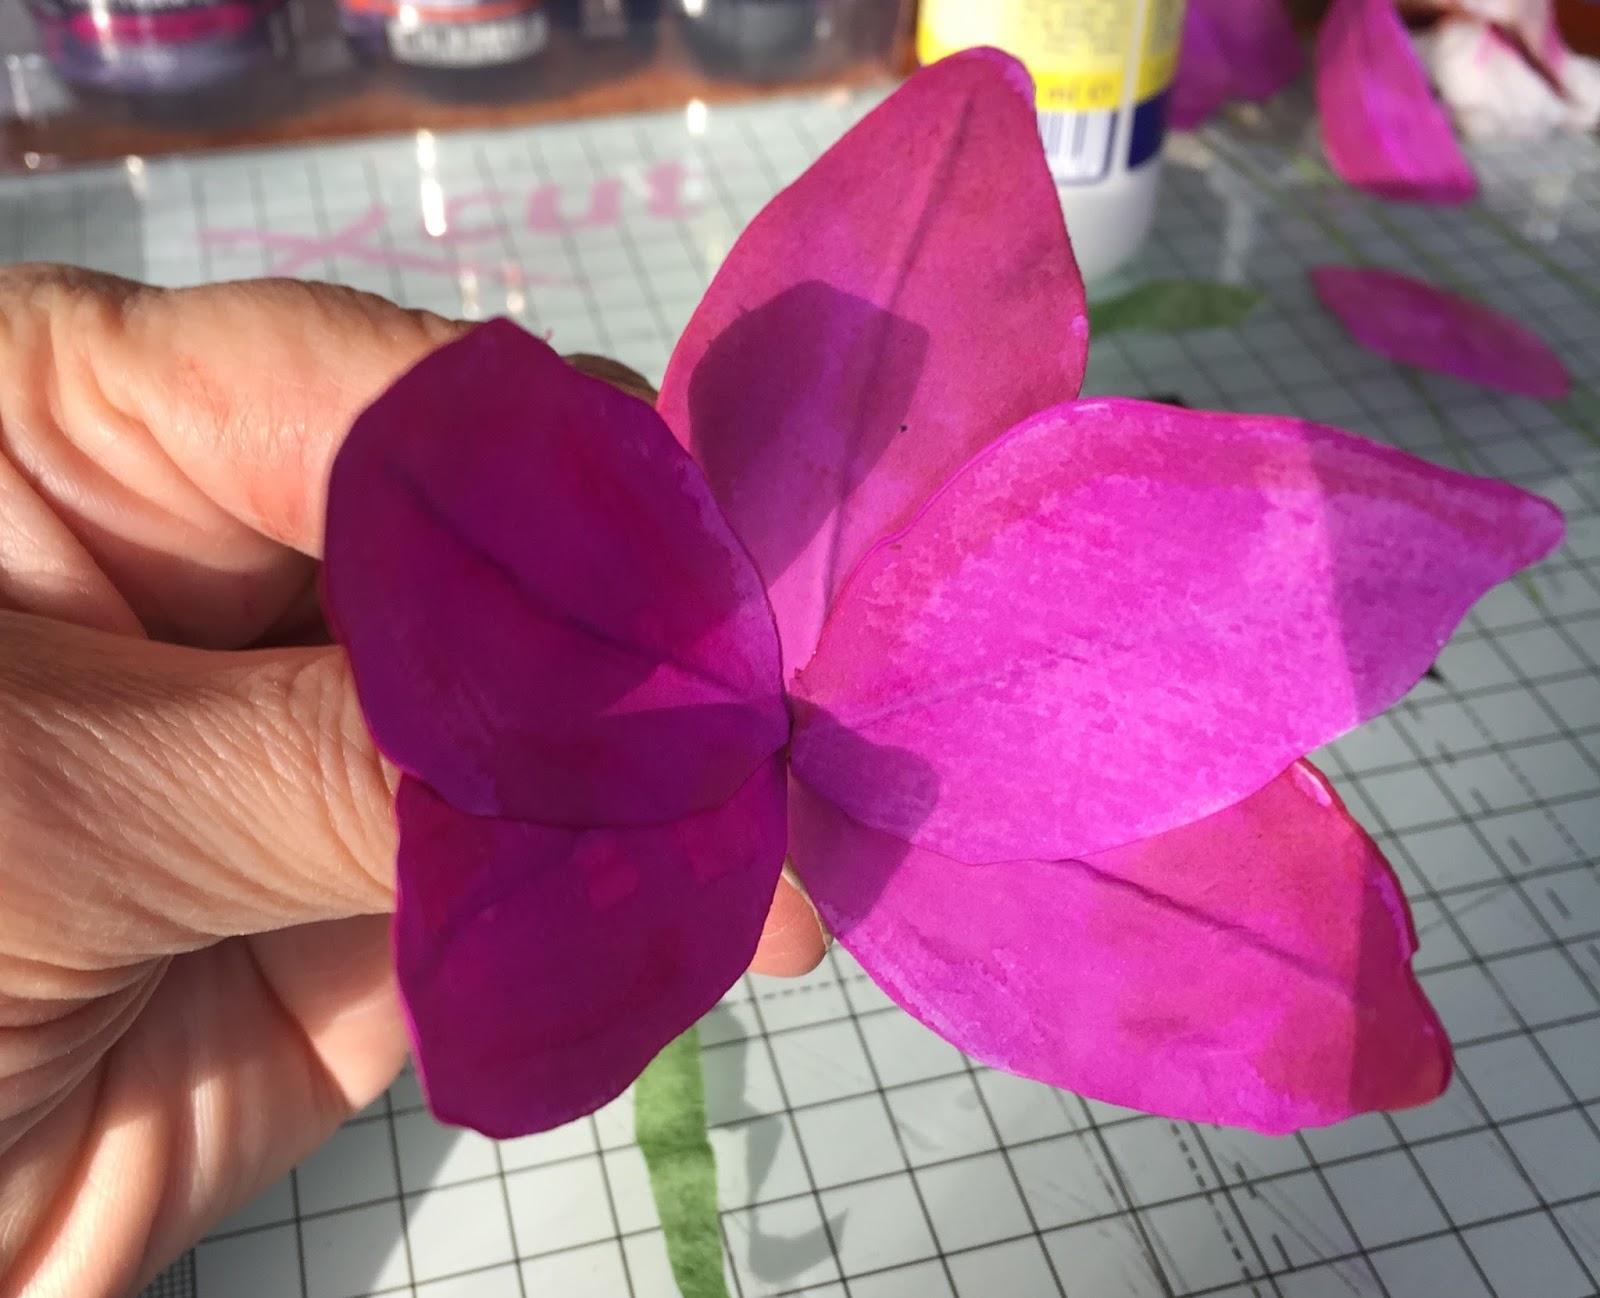
So now for the petals. First of all you're going to need to cut them into separate petals because we're going to wire them as individuals not groups. Can I give you a word of advice.......try to keep them together in groups so you know which petal goes with which! They are all slightly different shapes so it'll make life easier if you do!!
Okay so this next step you're going to do with all five petals. It's basically the same process you did with the middle. Take a matching pair of petals, apply glue to one of them then lay your wire down on top as shown (note the wire goes almost the full length of the petal)....
Then lay the other petal on top, sandwiching the wire.....
Shape slightly by lightly curving the edges and then bend the wired petal as shown below. Repeat with the four remaining petals.
Still with me? Sorry for all the photos but I wanted to make it as clear as possible! It's not as long winded as it might seem its actually quite quick to put one together. Just want to give you a couple of tips about using stemtex before we go any further, firstly I would suggest you cut the tape down the middle to reduce the width. It makes it less bulky when you have multiple stems to tape and also makes it go further ;) Also as you wind the tape stretch it down slightly at an angle as shown below, the stretching makes it stick and pulling it down at an angle keeps it neat.
Right so lets get this flower wired up; start by taking the set of two petals place them side by side and using a piece of the stemtex you're going to tape them together......
Now take the remaining three petals, position as shown and tape together.....
Now slide the throat section we made earlier into place (slide it up between the base two petals and pull in tight) and tape again to secure..........and voila........you have a wired orchid :)
To make a stem of orchids simply make more than one and then tape them together to form your stem. Here's a couple more pics of another stem in a different colour........
Well hope that's been helpful! Will be back with a rose tutorial next week :)
Thanks for stopping by
Donna x