Sunday 31 August 2014

Flower Power....

.....is the new theme over on Sunday Postcard Art.  Now in my head I had intended to create a real 60.s vibe card but it kinda evolved into something a little different!! Like it anyway though!
Do pop over to Sunday Postcard Art and join in the fun......all types of mediums are welcome ...... you don't have to be a stamper.
Donna xx

Saturday 30 August 2014

A little notebook.....

....for this weeks That's Crafty make.  Here's a little look but as usual you'll find all the details on the That's Crafty blog, pop over and say hi!

Donna xx

Tuesday 26 August 2014

Happy Days.....

......especially if today is a dry one after all the rain we had yesterday!! Anyway enough of the moaning about the weather it's time for my last card of this month using the new framed floral stamps by Creative Expressions.  I've used a couple on today's card......Sunflower Delight and Desert Daisies
Nice quick and easy one this.......first stamp your floral panels and paint with Distress Ink (or use the distress pens).....I've used Spun Sugar, Squeezed Lemonade, Peeled Paint and Pumice Stone. Trim the panel and mount onto some brown card.
For the background panel take a rectangle of off white card ( I used milk) and using a bit of cut 'n' dry foam lightly colour with Spin Sugar and Pumice Stone Distress Ink......keep it pale in the middle and darken the edges more with the Pumice Stone.  Add a few bits of stamping using the Fern background stamp, then some sparkly texture with Cosmic Shimmer Aurora Sparkle Texture Paste and the Squared Mask by That Special Touch.  
When the texture paste is dry, simply mount up the floral panels, add  the stamped sentiment and then a few pearl swirls....I mounted the panels with 3d glue gel and had the pearls coming out from underneath the panels.

Donna xx


Saturday 23 August 2014

A vintage trip to Paris...

....for this weeks That's Crafty make......
.....as usual full details are on the That's Crafty blog......pop over for a look :)
Donna xx

Friday 22 August 2014

This is a Man's World.....

....well over at the That's Crafty challenge blog anyway (not so sure I'd agree in general! Lol!).  Here's my 'All Male' tag that I've made for the challenge.....
Started out by stamping the three guys ....The Time Travellers, The Chemist.....onto some thin scrap paper and cutting out to create myself some masks.  Then I stamped them onto some white stamping card, masking each one off as I went, once I had them stamped I kept the masks in place and added some background stamping using the text stamp from The Chemist set and the cogs from the Time Travellers set. Then I cut everything out in a tag shape leaving parts of the images hanging over the edge.
Then I blended some distress ink onto the background and painted the figures with it as well. Then finished with some die cut lettering and a few Chit Chat words.

Make sure you pop over to the challenge blog and join in the fun.....there's a chance to win £20 as well.

Donna xx


Thursday 21 August 2014

A buzzing little challenge....

...over on TagAlong......BEES! I got to pick the theme for this week over at TagAlong and I have to admit I choose 'BEES' to give me a chance to play with a new die that I got the other week from Country View Crafts.....Susan very generously gave the DT team a chance of having one of the new Tim Holtz layered dies and I chose the ........ yes you guessed where this is going .......the Bee!
Donna xx


Wednesday 20 August 2014

Blog Hop Winners............

.............The Creative Expressions Blog Hop has now come to a close.
Firstly, we would like to thank everyone who took part over the past few days - we've all enjoyed it and hope that you have too. There have certainly been many positive comments along the way, and it seems that everyone has been able to take a little bit of inspiration away with them, which is great news!
All of the winners have now been chosen, so here are the list of lucky winners from each of the Blogs:-
Sue Wilson - Jackie Whiteman
Julia Watts - Wendy Armstrong
Tracey Laughton - June Ballenger
Kim Bacon - Lynda Edmondson
Donna Ratcliff - Clai01
Neil Burley - Karen Burton
Tracy Heaton - June Smith
Kerry Hickton - Sam Smithard
Pam Smith - Anne Crawford
Creative Expressions - Crafty Jo
Well done everyone! If you are one of the lucky winners, then please email Tracey@creative-expressions.uk.com with your postal details so that we can get your prizes sent out to you.

Donna xx

Tuesday 19 August 2014

Morning All ......

....well time for my weekly play with some Creative Expressions stamps ( and don't forget there's still chance to have some fun on the blog hop...ends today at 5pm....check it out a couple of posts down) and today I've got a card to show you using one of the new floral stamps in the 'Singles' range, the one I'm using is Calla Lily Trio......
Start off by stamping the Calla Lilies a couple of times, cut the framed panels out and paint them with distress inks.....I've used Shaded Lilac, Peeled Paint, Squeezed Lemonade and Brushed Corduroy but you can use whatever colours you like. Mount the panels onto some brown card and leave on one side.

Now you need to make yourself a bit of backing card. Start by applying some blobs of distress ink in the colours you used for your flowers to your craft mat/glass mat spritz with some water and then swipe a sheet of white card through the ink dry and repeat if and until you are satisfied with level of colour.  Then randomly stamp a bit of interest with a background stamp......I've used a chequerboard stamp from the Vintage Flight set and stamped it with Brushed Corduroy distress ink. 

Cut some rectangles from this back with some brown card and and mount your flower panels onto them. Cut another thin, long rectangle and mount this onto some brown card....size etc will depend on how big your finished card is going to be and how big a border you put round your flower panels.
Assemble all your pieces and glue in place, trim with some self adhesive pearl swirls and then finish with a stamped sentiment.

Donna xx


Saturday 16 August 2014

Go Confidently.....

...in the Direction of your Dreams.  Not a bad thing to bear in mind, eh? This is my weekly piece for That's Crafty, as usual full details are on the That's Crafty blog.
Thanks for stopping by :) 
Donna xx

Friday 15 August 2014

Time for another blog hop.....

Welcome to the Creative Expressions August 2014 Blog Hop! Hopefully you got here from Kim's blog but if you didn't here's the start at the Creative Expressions News Blog!
These new Christmas designs from the Singles Range at Creative Expressions, include seven different stamps. As you will see from the samples made for the Blog Hop, they do not just have to be used as they are but can be altered and interchanged to give lots of different options.
One randomly selected person commenting on this blog post before the closing date will win the following fabulous prize, which includes some of the new stamp designs.

For my project, I used the Merry Christmas stamp……..
I started out by taking the Fern Background stamp and stamping and then embossing it in gold onto a piece of white card and then I repeated the process to give myself two stamped background panels.
Can't have them looking all white and plain......they need colour!  So colour they got in the form of Squeezed Lemonade, Wild Honey and Ripe Persimmon Distress Ink.  Using some Cut 'n' Dry foam I started off with the lemon, in the centre of the piece then moved onto the wild honey and finally the ripe persimmon on the outside and then finally a quick rub over the whole thing again with the lemon.  
 Once I was happy with the colour I mounted both panels onto a pieces of gold satin card, then mounted these onto a card blank.

Then to create the centre topper panel I stamped and embossed the Merry Christmas twice onto some white card. Trimmed and mounted one of them and placed on top of the background panels.
From the other stamped panel I cut out the Poinsettia and the small floral panel at the top, painted them with distress ink and glued them in place,decoupage style, using some 3d glue gel.  
Then to finish I added a nice bow to the left of the topper using some sheer ribbon.

Thanks for visiting my blog, don't forget to leave a comment below in order to be in with a chance of winning a prize!
Once you have done that, you will need to click here to visit whoever's blog.
To help you along the way, here is a list for the Blog Hop:-
5. Donna Ratcliff (You're here :-) ! )
Start page, prize details and how to take part: Creative Expressions News Blog. The blog hop started on 15th August at 6.00am and ends 19th August at 5pm.
Thank you for taking part in our Blog Hop – good luck!

Donna xx

Tuesday 12 August 2014

A little floral box....

...for this weeks Creative Expression make.....


I started out by making a small box.  I cut 2 strips of craft card measuring 2.5" x 8.5" and then using a score board I scored at 1/2", 3", 5.5" and 8", you should end up with two strips that have three 2.5" squares with a 1/2" strip[ either end. Glue these together to make a box that has an opening flap top and bottom. Then I stamped and gold embossed five of the new Sunflower Delight designs (didn't put one on the bottom but you could if you wanted) Then I cut them out, edged with a little distress ink and coloured with some cosmic shimmer mica by mixing it with a little water and painting it on. One benefit of embossing the image when using the mica's to paint with is you don't have to be too careful because the embossing will repel the mica.

  Once I'd got them all painted, I simply glued them all in place using a little Cosmic Shimmer glue. Then I stamped various sentiments from the All Occasions set, cut them out and glued them onto each side as well.


Donna xx

Monday 11 August 2014

All Aboard....

....for another sneaky look at the new stamps that Sheena will be launching tomorrow on Create and Craft.  Showed you the lovely cottages yesterday so today it's the turn of the train.....


...this first one also uses the card from one of the 'Village Mystery' sets, these will also be on the shows and the whole lot go so well together. Now of course you don't just have to use them on cards, here's a little wooden box which I've painted and embossed and then topped with a stamped and glazed panel.......


So don't forget tomorrow on Create and Craft....first show at 1.00pm second at 6.00pm

Donna xx

Sunday 10 August 2014

Who lives in a house like this.......


.....looks a little fantasy to me.  This is one of the lovely new stamp sets that Sheena Douglass will be launching on Create and Craft on Tuesday.  She's also going to have the Village Mystery stamps on as well and they go SO well with this and the other new stamp set that is coming out...little look of that tomorrow.....so don't forget to tune in and have a look. First show is at 1.00pm so feet up and a leisurely tv lunch I reckon!!

Donna xx

Saturday 9 August 2014

Danger!!

...looks like a potent concoction might be being produced by this chap.......
....full details over on the That's Crafty blog, pop over and say hi :)
Donna xx

Friday 8 August 2014

So today is .....

.....the start of a new challenge over at the That's Crafty Challenge where the theme is 'Stamping Ground' ie anything to do with stamping (no digi's though), do pop over and take part ........you stand a chance of winning a £20 voucher to spend at That's Crafty.  I've used some IndigoBlu stamps for this large tag.....
To make the background tag I stamped and clear embossed 3 of the 'Flutterby' stamp by IndigoBlu onto a large white tag. Then using a bit of cut 'n' dry foam I applied Mowed Lawn, Mustard Seed and Picked Raspberry distress ink all over the tag. Then I used various stamps from Kaisercraft and Artistic Outpost to add some further background interest......stamps I used were.......Generation Redux, Lattice, and Tic Toc. Then I stamped the sentiment from the Artistic Outpost Happiness set and mounted it onto a black mat before positioning on tag.
Using the 'Big Butterfly' stamp I stamped and heat embossed it in black onto some heat resistant acetate (don't forget to use an anti static bag on your acetate first!).....
Then I coloured the reverse side with Spectrum Noir pens (any alcohol marker pens will work). For this to work the best you really need to pick darker/brighter colours......
Once the pen has dried, and it dries very quickly, you need to paint over it with white acrylic or gesso......I used gesso.  You will find some of the colour bleeds into the paint but that doesn't matter..... 
 

Once the gesso was completely dry I simply cut out the butterfly and glued it onto the tag.  I only applied glue under the body so the wings had freedom to move but you could glue it all down if you prefer.  For the bow at the top I simply took some crinkle ribbon and coloured it using the same colour of distress inks that I had used in the background.

Don't forget to pop over to the challenge blog and check out the rest of the design teams pieces and to join in the fun yourself. Thanks for visiting.

Donna xx

Thursday 7 August 2014

A man's best friend....

....or should I say a girls! For my second piece for Country View Challenges I've combined a love of tags and quotes with a love of dogs for this tag.....

Started off by stamping the girl and dog (Lost Coast stamp) onto a plain white tag using black Memento Ink. Then I applied a mix of Pumice Stone and Broken China Distress Ink using a piece of Cut and Dry Foam to the tag, making sure I kept the colour light over the top of the figures.
Then using a Dylusions stencil I added some diamond pattern with more of the Broken China Distress Ink and a tiny bit of stamping with a Kaisercraft stamp. I added the quote using some mini alphabet stamps.
I used Promarkers to add a some colour to the stamped figures and then lightly blended a little more Pumice Stone over the top.  Really love using alcohol markers over the top of distress ink, because the colours are slightly translucent the background shows through a little and the images blend in so well. To finish off I added a bow of Crinkle Ribbon coloured with the same colours of Distress Ink.
Make sure you pop over to play along with the Country View Challenges.....you could win some some crafty spending money at Country View Crafts or maybe get picked to be a guest designer.

Donna xx

Tuesday 5 August 2014

Creative Expressions have some new floral stamps....

....and  the DT have been given the chance to play with them :) So for my first make I came up with this cheerful, summery tag....
Started off by blending Mowed Lawn and Peacock Feather Distress Ink onto a blank tag, then splashed a bit of water onto the surface left it a few seconds and then blotted it off with some kitchen roll.....

Then using the Doodle Squares stencil and some Pumice Stone Distress Ink I added some background interest and followed that by stamping a few swirls..... 
I stamped the flowers (Anemone Planter) onto a separate piece of card and coloured it up with the same colours, trimmed it up and mounted it onto the tag......
Then I stamped it again and this time just coloured the frame sections and the flowers, which I cut out and layered up over the previously stamped piece.  Also stamped it out again but this time just coloured and cut out the flowers, which I glued around the originally positioned piece. To finish I added some wording and some seam binding coloured with distress ink to match the tag.

Thanks for stopping by...
Donna xx


Saturday 2 August 2014

Friday 1 August 2014

Word Play.....

....is the new theme for this months challenge on Country View Challenges. Do pop over and join in the fun, there's a chance to win a £20 voucher to spend at Country View Crafts and also to join in the fun as a guest designer :)

For my first piece for the challenge I decided to do a couple of pages in my small moleskine journal. Never like doing the first pages in case I mess them up!! So although I have quite a few pages used up in this journal the first ones were empty, but decided that the quote I wanted to use would be perfect for the opening pages ...
I was very good and took a few pics whilst I was making this so if you fancy seeing how it evolved then carry on reading!  Started off by applying some yellow and green acrylic paint to the pages (had already given them a coat of gesso). I often use a bit of sponge to put the paint down on a background which is what I did here.  Then I took a stencil (That Special Touch - Swoosh)and applied some blue acrylic 
Then I painted the back of an alphabet stencil (That Special Touch - Alpha Sprinkle) with Iced Spruce Distress Paint and used it to stamp the letters onto the page in a few places... 
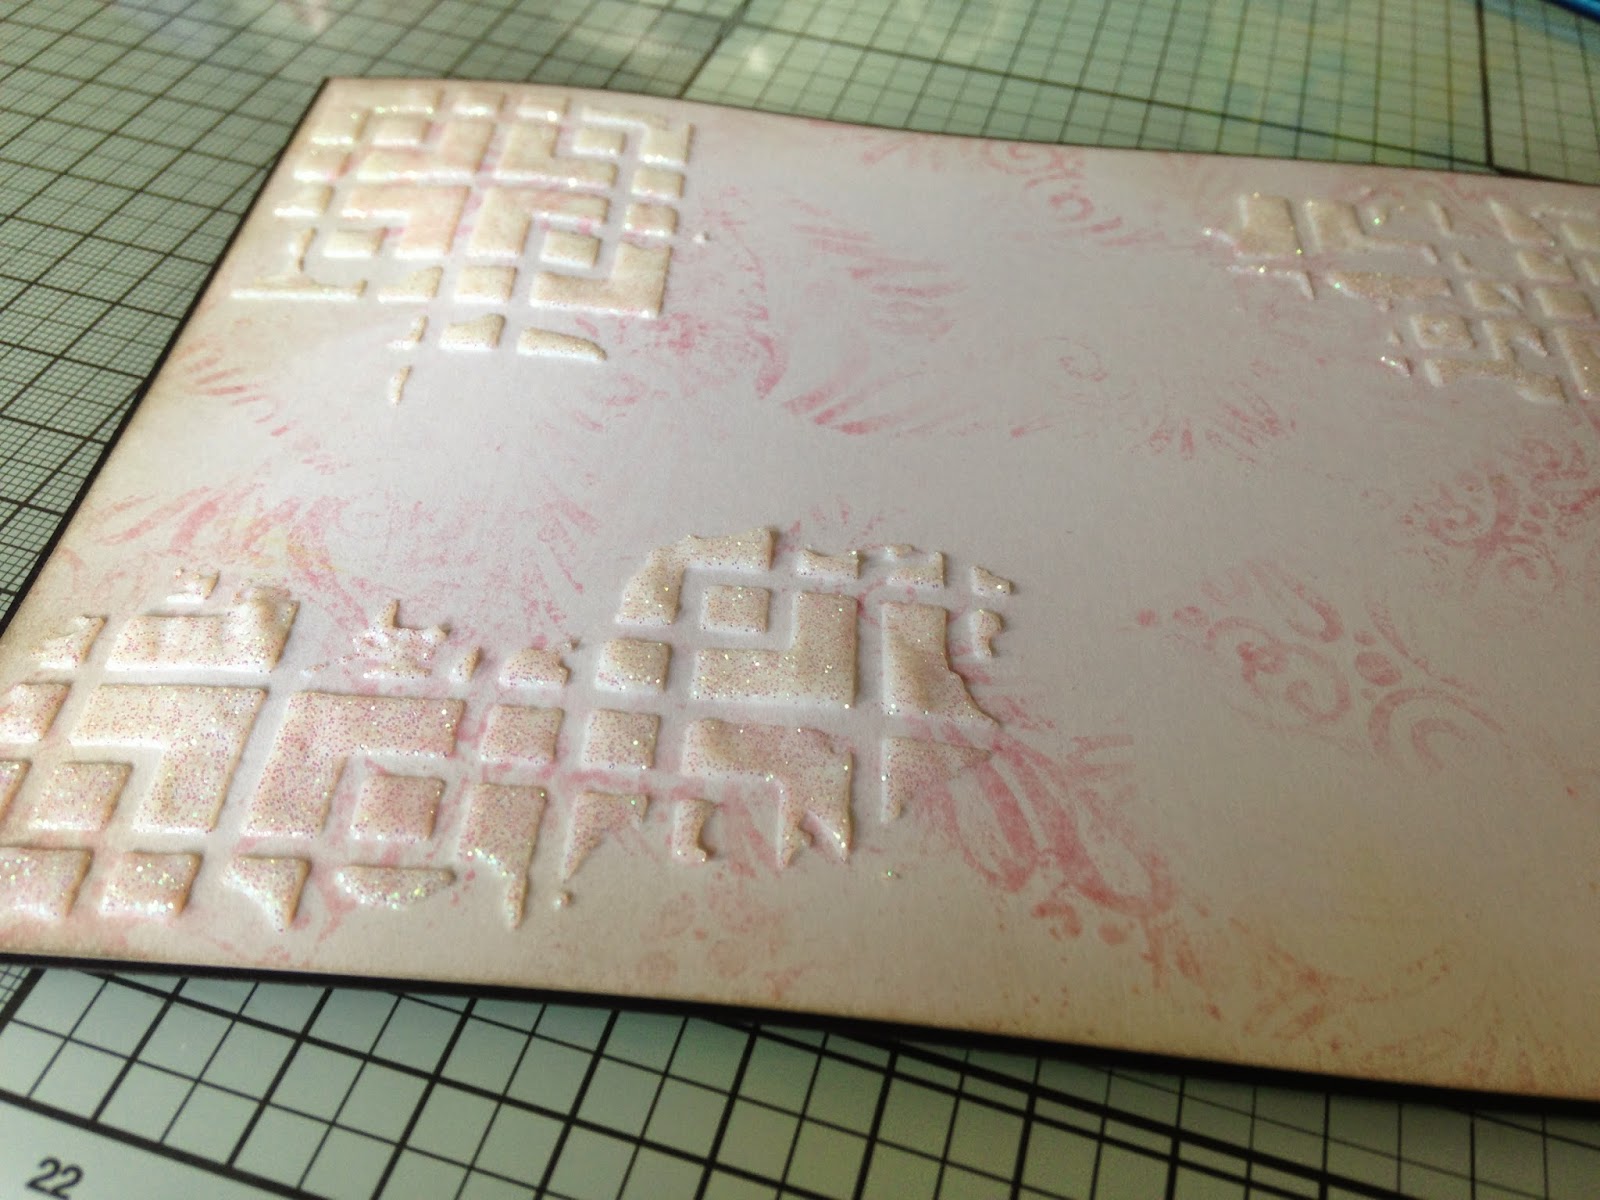
Then another layer in the form of a bit of stamping using a grid stamp by Kaisercraft.... 
Then I took a white gel pen and coloured in a few of the grid spaces.... 
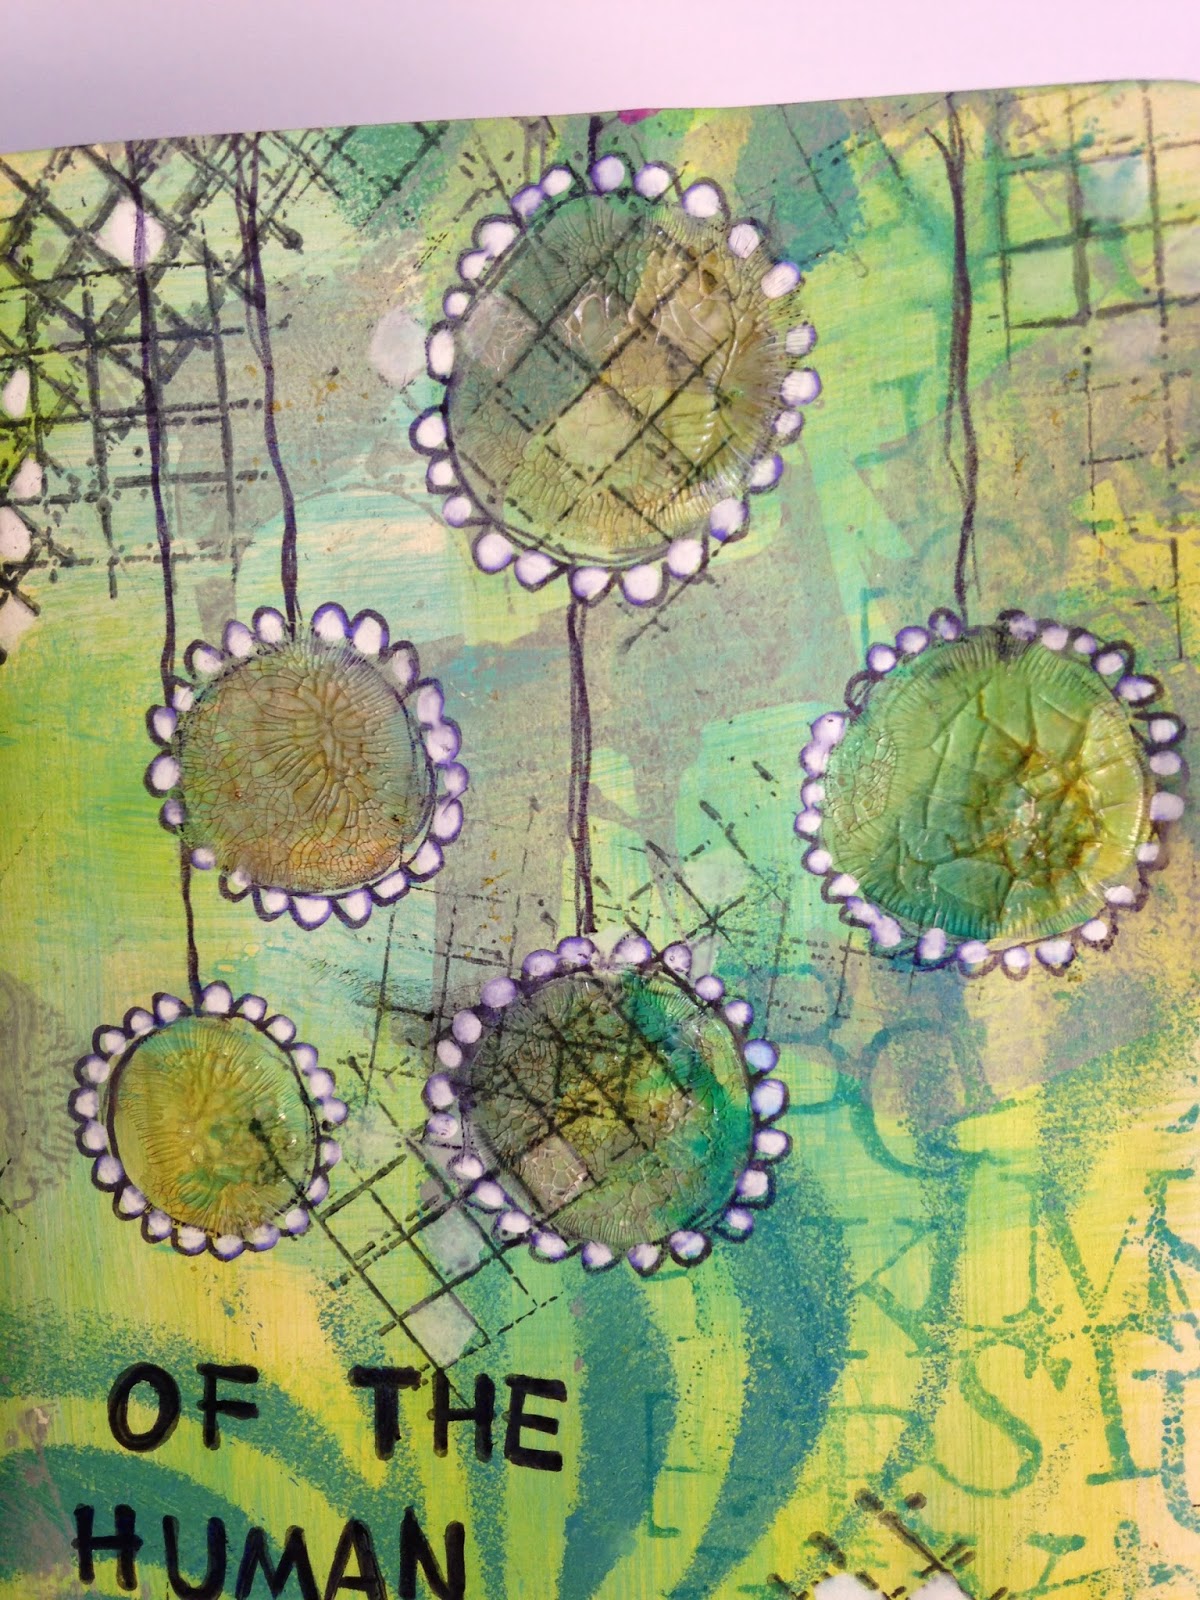
Then I painted a few circles with Rock Candy Crackle paint and once it had dried and cracked doodled round it and added some more white gel pen.  Also highlighted the crackle by rubbing over the top with a bit of distress ink.......would tell you what colour but to be honest I just grabbed a rather dirty bit of Cut 'n' Dry and used that......it was a sort of browny colour!!!! Lol! 
Then I used some alphabet stamps to stamp the quote.  Still with me? Well Done!! Don't forget to pop over to Country View Challenges to join in the fun, see you back hopefully in about a week with my second challenge make.

Donna xx